How to Reverse Video Online: The Complete Reverse Effect Guide 2026
Have you ever seen a video where a person seems to "un-jump" back upward? Or a scene where smoke is sucked back into the fire, shattered glass reassembles, and everything returns to its place as if time itself reversed? These fascinating effects are the result of one of the simplest — yet most creative — techniques in video editing: reversal.
Reversing video means playing a file backwards — the last frame becomes the first, and the entire file is mirrored in time. The result can be something completely unrecognizable, or it can reveal patterns and movements that simply do not exist in the original version.
In this complete guide, you will learn how video reversal works technically, the history of reverse effects in film and television, professional techniques for creative use of reversed video, and how to do it all for free, right in your browser, in seconds.

Table of Contents
- What Is Video Reversal? How It Works Technically
- The History of Reverse Effects in Film & TV
- Professional Techniques with Reversed Video
- How to Reverse Video Online: Step-by-Step
- Real Use Cases: How Creators Use Reversed Video
- Reversed Video Across Content Types
- Common Mistakes When Using Reversed Video
- Frequently Asked Questions (FAQ)
- Conclusion
What Is Video Reversal? How It Works Technically
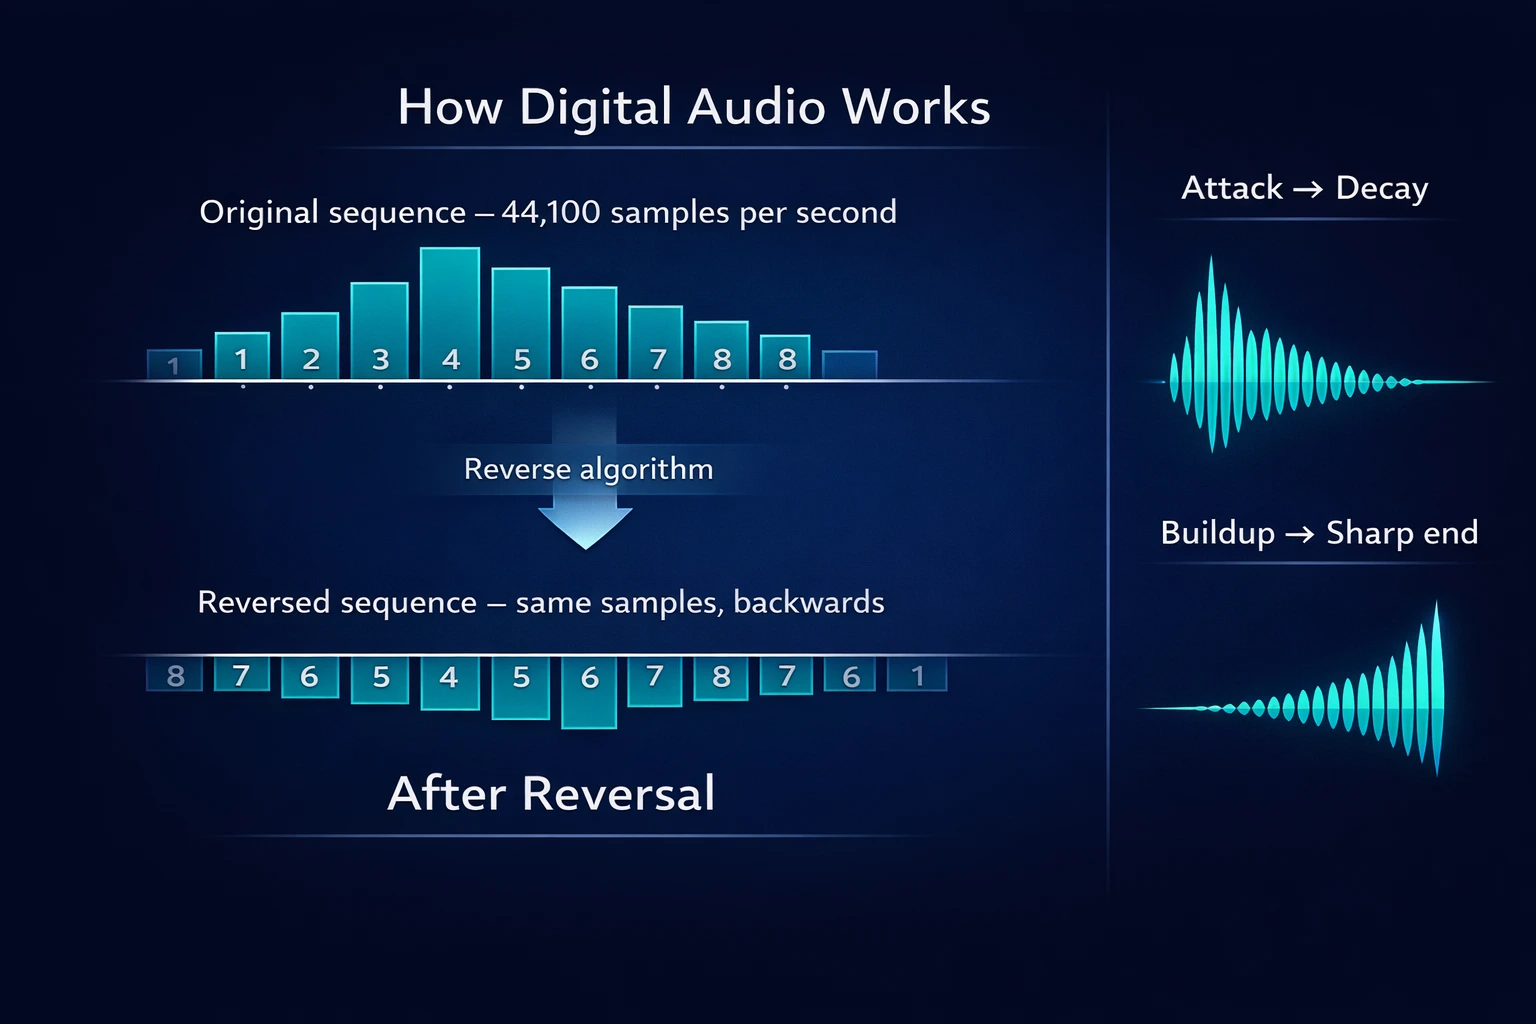
Reversing video is the operation of inverting the order of frames in a file. In technical terms, a digital video file is a sequence of frames — typically 24, 30, or 60 per second (fps). Each frame represents a specific moment in time, composed of millions of pixels.
When you reverse a video file, the algorithm simply reads this sequence backwards: the last frame becomes the first, the second-to-last becomes the second, and so on until the first original frame becomes the last.
The process is mathematically simple — and therefore instantaneous in modern tools. There is no complex calculation, no synthesis algorithm, no color or resolution processing. It is literally an inversion of the temporal frame sequence.
Why does the result look so different?
Despite the simplicity of the process, the result looks radically different from the original. This happens because our visual perception is deeply temporal — we expect movements to follow predictable physics: gravity pulls objects down, smoke rises, water flows in one direction.
When a cup falls and breaks, for example, we see the shards scatter. Reversed, the shards magically reassemble and the cup returns intact to the table — a completely unnatural image that the brain immediately recognizes as "time running backwards."
Similarly, people walking, cars moving, facial expressions — all have an expected temporal direction. Reversed, these movements produce scenes that seem to defy physics and create parallel realities.
What changes and what stays the same
What changes after reversal:
- The temporal order of all visual events
- The direction of all movements
- The apparent physics of scenes (gravity, flow, impact)
- The narrative and dramatic feel
What stays the same after reversal:
- The colors and contrast of the video (visual palette)
- The resolution and image quality
- Total file duration
- Technical quality (no quality degradation)
The History of Reverse Effects in Film & TV
The intentional use of reversed video in film has a rich history that begins in the early days of cinema and continues to this day. Understanding this history helps contextualize the techniques and creative possibilities of reversal.
The pioneers: Georges Méliès and early cinema trickery
Georges Méliès, one of the first filmmakers in history, already used reversal techniques in the late 19th century. In films like "The Magician" (1899) and "A Trip to the Moon" (1902), Méliès would stop the camera, reposition elements in the scene, and resume filming — creating disappearance and transformation effects. True film reversal came with manual film editing, where filmmakers literally assembled frames in reverse order.
From the 1920s onward, the Marx Brothers and other silent film comedians used reversal to create visual gags — people "un-falling" out of holes, objects flying back into hands, entire scenes running backward for comedic effect.
Television and music videos: reversal goes mainstream
In the 1980s and 1990s, with the advent of non-linear editing and music videos, video reversal became a popular and accessible effect. Directors like Michel Gondry and Spike Jonze used reversal extensively in music videos — creating psychedelic and surreal aesthetics that defined the visual language of an entire generation.
The music video for Björk's "Bachelorette" (1997) and Daft Punk's "Around the World" (1997) are classic examples that incorporate reversal as a central narrative element.
Contemporary creative use
Today, reversed video has established itself as a legitimate and creative tool in modern audiovisual production. Content creators, filmmakers, editors across all niches — from social media videos to documentaries, from music clips to experimental films — use reversal regularly and intentionally to create transitions, effects, and sensations that simply cannot be achieved any other way.
Professional Techniques with Reversed Video
Technique 1: Full Clip Reversal (Reverse Clip)
The most basic and powerful technique: reversing an entire clip from start to finish. The result is a short film where everything happens backwards — people walk in reverse, dialogue is inverted, objects defy gravity. The process:
- Import the video clip into the tool
- Reverse the complete file (or just the video track)
- Preview the result and adjust if needed
- Export in your desired format
The result preserves the original colors, lighting, and composition, but completely subverts the narrative and physics of motion. It is the visual equivalent of "rewinding the tape."
Practical applications of full reversal:
- Creative video and film openings
- Dramatic "rewind" effect
- Dream sequences or alternate reality scenes
- Transitions between scenes with reverse continuity
Technique 2: Reverse Transition
The reverse transition is a popular professional video editing technique: take the last few seconds of a scene, reverse that segment, and use it as a transition to the next scene. The result is a visual flow where one scene seems to "unwind" and smoothly morph into the next.
The technique works especially well with:
- Camera movements (pan, tilt, dolly)
- Scenes with continuous moving elements
- Transitions between clips with similar visual composition
Technique 3: Selective Reversal (Video Track Only)
Reversing only the video track while keeping the original audio creates one of the most interesting and unsettling effects in editing: the sound plays forward while the images run backward. The contrast between audio and video generates a unique narrative tension — dialogue that doesn't match the lips, music that doesn't follow the movement.
It is a common technique in thriller, horror, and experimental film soundtracks, where the goal is to create discomfort and strangeness in the viewer.
Technique 4: Reversal with Speed Changes (Reverse Speed Ramp)
Combining reversal with speed changes creates even more dramatic effects. A reversed clip in slow motion produces a dreamlike, ethereal sensation — objects floating back into place, smoke slowly recollecting. A reversed clip at high speed has a comedic or chaotic impact.
To implement: first change the speed of the clip with the speed tool and then reverse the result, or use the reversal tool that already includes speed options.
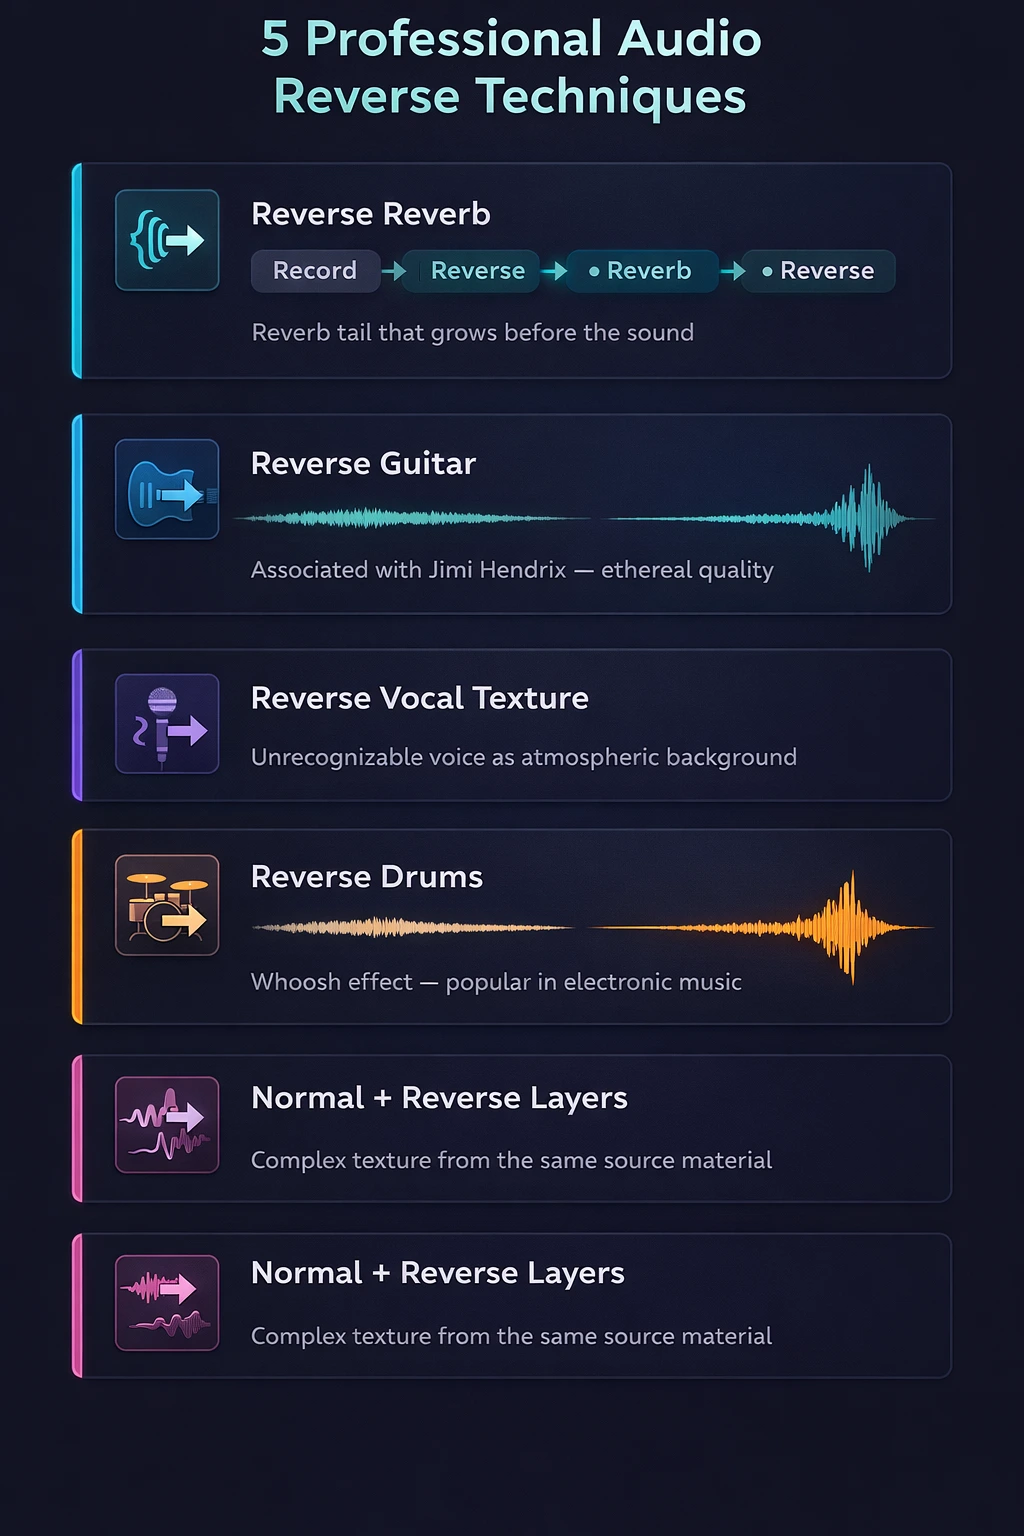
Technique 5: Layering Normal + Reversed
Layering the original video with its reversed version (at different opacities) creates complex visual textures where movement goes forward and backward simultaneously. It works especially well with crowd scenes, urban landscapes, particle effects, and instrumental tracks.
How to Reverse Video Online: Step-by-Step
With Edit-Video.Online, reversing a video file takes literally seconds — processing is instantaneous and happens entirely in your browser, without sending any data to external servers.
Step 1: Access the tool and upload your file
Go to the video reversal tool and upload your file. Supported formats include MP4, AVI, MOV, MKV, WebM, and WMV. Processing happens locally in your browser — your files never leave your device.
Step 2: Choose what to reverse
Select whether you want to reverse only the video track, only the audio, or both tracks simultaneously. Reversing video + audio creates a complete "time reversal" effect. Reversing only the video keeps the original sound intact — ideal for narrative contrast effects.
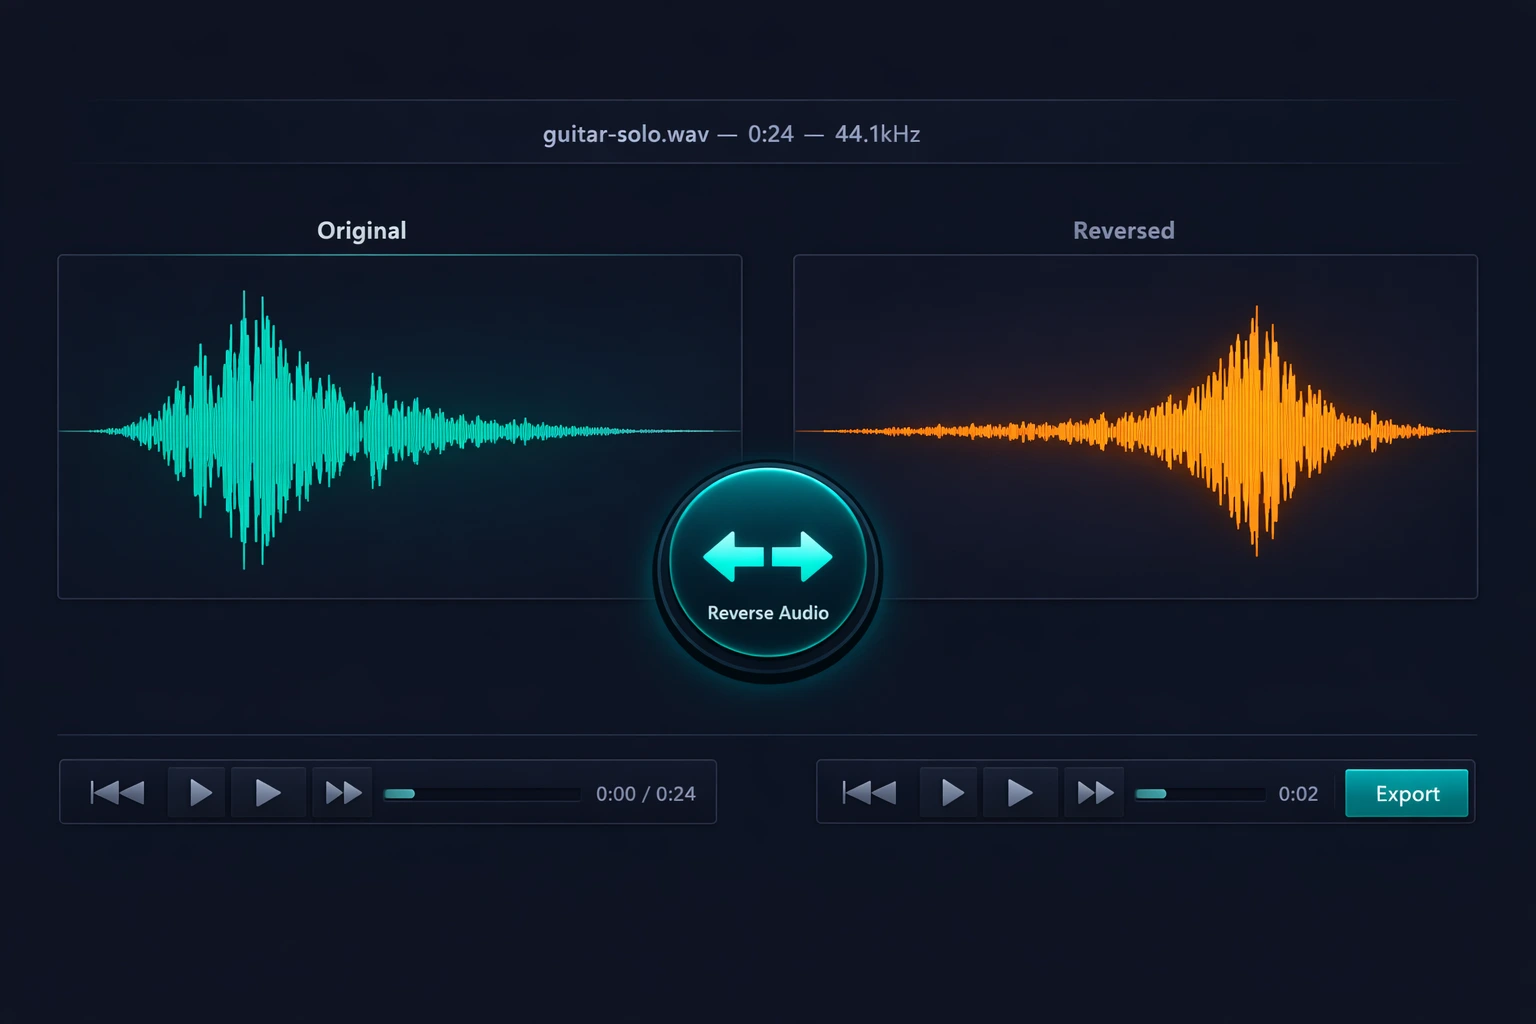
Step 3: Click Reverse
A single click processes the entire file. Reversal is instantaneous for normal-sized files — a 5-minute MP4 video is reversed in less than 2 seconds on most devices.
Step 4: Preview the result
Use the built-in player to watch the reversed video before exporting. Pay attention to motion — people walking backwards, objects falling upward, liquids flowing in reverse. If something doesn't look natural (or looks too natural), you can adjust before exporting.
Step 5: Export in your desired format
If the result is what you expected, export as MP4 or MOV for maximum quality (ideal for further editing) or as WebM for immediate web use.
Tip: work with specific segments
To reverse only a portion of a larger file — such as a specific scene or movement — first use the cut tool to extract the segment, reverse the isolated segment, and then use the merge tool to reintegrate the reversed section at the original position in the file.
Real Use Cases: How Creators Use Reversed Video
Filmmakers & Video Pros: Creating Transitions and Effects
Reversed video is one of the quickest tools for creating impactful transitions between scenes. A character "un-walking" back through a door, a car reversing through a chase, an object flying back into an actor's hand — all of these effects are used in commercial productions across every genre.
To implement: export the segment that precedes the transition, reverse it, and reinsert it into the project before the original element.
Video Editors: Developing Effects for Digital Content
Web and social media video editors use reversal extensively to create effects that grab viewer attention. The "reverse loop" — where a clip smoothly returns to its start — is one of the most popular effects on platforms like Instagram, TikTok, and YouTube Shorts.
The technique creates a hypnotic, infinitely repeatable sensation that keeps viewers watching longer.
Content Creators: Effects for Social Media
For YouTube, Instagram, and TikTok creators, reversed video is an easily accessible effect that creates immediate visual impact. "Un-jumping" scenes, smooth transitions between takes, "magic" effects where objects appear and disappear — all are popular effects that require nothing more than a simple reversal tool.
Visual Artists: Exploring the Aesthetic Potential of Reversal
One of the most creative applications of video reversal is artistic exploration. Visual artists create installations and experimental videos where reversal is the central element — not as a trick, but as an aesthetic language. Reversal allows questioning the linearity of time and creating unconventional narratives.
Educators & Instructors: Demonstrating Processes
Reversing a process or demonstration can reveal movement patterns and sequences that are not obvious in the forward direction. Some educators use reversal as an analytical tool — showing a scientific experiment in reverse, for example, helps students understand the direction of physical phenomena.
Reversed Video Across Content Types
The use of reversed video varies significantly across content types. The table below shows how each type uses the technique in characteristic ways:
| Content Type | Most Common Use | Reversed Element | Desired Effect |
|---|---|---|---|
| Music videos | Reverse scenes | Transitions and movements | Psychedelic, dreamlike aesthetic |
| Film & suspense | Reverse clips | Action scenes | Suspense and unpredictability |
| Social media content | Creative reversal | Transitions and cuts | Immediate visual impact |
| Experimental video | Reversed layers | Any scene | Sense of unreality |
| Film scores | Reversed footage | Contemplative shots | Timeless depth |
| Tutorials & education | Demonstrative reversal | Process sequences | Clear visual repetition |
| Sports & action | Reverse replay | Plays and movements | Dramatic emphasis |
Common Mistakes When Using Reversed Video
Mistake 1: Overusing reversed video
Reversed video is impactful precisely because it is uncommon and surprising. Overusing it — on many scenes of a production or repeatedly throughout a video — dilutes the impact and can make the visual experience fatiguing. Reserve reversal for specific moments where the effect serves a clear purpose.
How to avoid: use reversed video as seasoning, not the main ingredient. One or two reversed scenes in a production have far more impact than an entire video built on reversal.
Mistake 2: Reversing without considering narrative context
Video reversal completely inverts the direction of movement and visual narrative. A scene that works wonderfully in reverse may not make sense within the context of the story or video as a whole.
How to avoid: before applying reversal, ask yourself: "Does this segment make sense in reverse? Does the reversed motion communicate what I want?" Always preview before exporting.
Mistake 3: Exporting in the wrong format for further editing
If you reverse a file and plan to continue editing — applying transitions, color correction, or cuts — exporting in a compressed format after reversal and before subsequent edits adds unnecessary compression and quality loss.
How to avoid: always export as MP4 or MOV with low compression when the reversed file will undergo further processing. Use more compressed formats only for the final export.
Mistake 4: Forgetting to check the audio
When reversing the video track, the audio may also get reversed if you don't select the correct option. Reversed audio sounds like an alien language — which may be the desired effect, or a mistake that compromises the scene.
How to avoid: before exporting, check that the audio reversal option is set as you intend. If dialogue is important, keep the original audio and reverse only the video.
Mistake 5: Not working with a copy of the original file
Reversal is a simple operation to undo — you can reverse the reversed file to get the original back. But if you make additional edits (cuts, effects) on the reversed file before realizing you want the original, it may be difficult or impossible to recover the initial version without artifacts.
How to avoid: always keep the original file untouched. Work on copies — especially when combining reversal with other edits.
Frequently Asked Questions (FAQ)
Does reversing video reduce the file quality?
No. Reversal is a simple mathematical operation — the sequence of frames is read backwards without any processing of colors, resolution, or quality. The reversed video has exactly the same technical quality as the original. The only possible quality loss occurs during export, if you use a highly compressed format.
Can I reverse only a portion of the video, not the entire file?
The reversal tool processes the complete file. To reverse only a specific section, use the cut tool to extract the desired segment, reverse that segment separately, and then use the merge tool to reintegrate the reversed section into the original file at the correct point.
What happens to motion and speed when reversing a video?
The playback speed stays the same — what changes is the direction of motion. People walk backwards, objects fall upward, liquids flow in reverse. The total duration does not change, only the temporal order of frames.
Can I reverse only the video without reversing the audio?
Yes. Edit-Video.Online lets you choose between reversing only the video track, only the audio track, or both tracks simultaneously. This flexibility allows you to create contrast effects between sound and image.
Does the tool work with any video format?
Yes. Edit-Video.Online supports MP4, AVI, MOV, MKV, WebM, and WMV for reversal. For maximum quality results, use MP4 or MOV files as input when possible.
How long does it take to reverse a long video?
Reversal is virtually instantaneous — the algorithm is computationally simple. A 60-minute MP4 video is reversed in less than 10 seconds on most modern devices. Processing time depends mainly on resolution and file size.
Can I use the reversed video commercially?
Reversing does not alter the intellectual property of the content. If you do not hold rights to the original video, reversing the file does not create a new right of use. For commercial use, make sure you have the necessary rights to the original material.
Does reversing twice return to the original?
Yes. Reversing a video file twice returns exactly to the original — it is a perfectly symmetrical operation. Each reversal mirrors the file in time; two reversals cancel each other out. This also means you can "undo" a reversal simply by reversing again.
Conclusion
Reversing video is one of the simplest operations in video editing — and one of the most surprisingly creative. The same file, read backwards, reveals movements, visual textures, and aesthetic possibilities that simply do not exist in the forward direction.
The essential points you learned in this guide:
- Reversal inverts the order of frames without altering colors, resolution, or quality
- The result looks different because the direction of all movement is inverted
- Selective reversal (video without audio or audio without video) is the most versatile technique — it creates powerful narrative contrasts
- Georges Méliès pioneered the use of reversal in cinema as early as the 19th century
- Use reversed video with restraint — the impact comes from the rarity of the effect
- Always keep the original file — reversing twice returns to the original
Try the video reversal tool on Edit-Video.Online right now — free, no installation required, with 100% private processing right in your browser.
Have questions about video reversal or want to share your experience? Reach out via our contact form.