How to Merge Videos Online: The Complete Guide to Combine Files 2026
Did you record a video in multiple parts and need to deliver a single file to the platform? Recorded separate clips for a project and want to combine everything into one continuous file? Have the intro, main content, and credits in separate files and need to join them all with professional transitions?
These three scenarios share the same solution: video merging. Joining multiple video files into a single continuous file is one of the most frequent operations in audiovisual content production — and, when done correctly, is completely imperceptible to the final viewer.
In this complete guide, you will learn the difference between merging and mixing video, how to prepare files before joining, which transition types to use in each situation, how to handle files in different formats, and how to do it all for free, right in your browser.
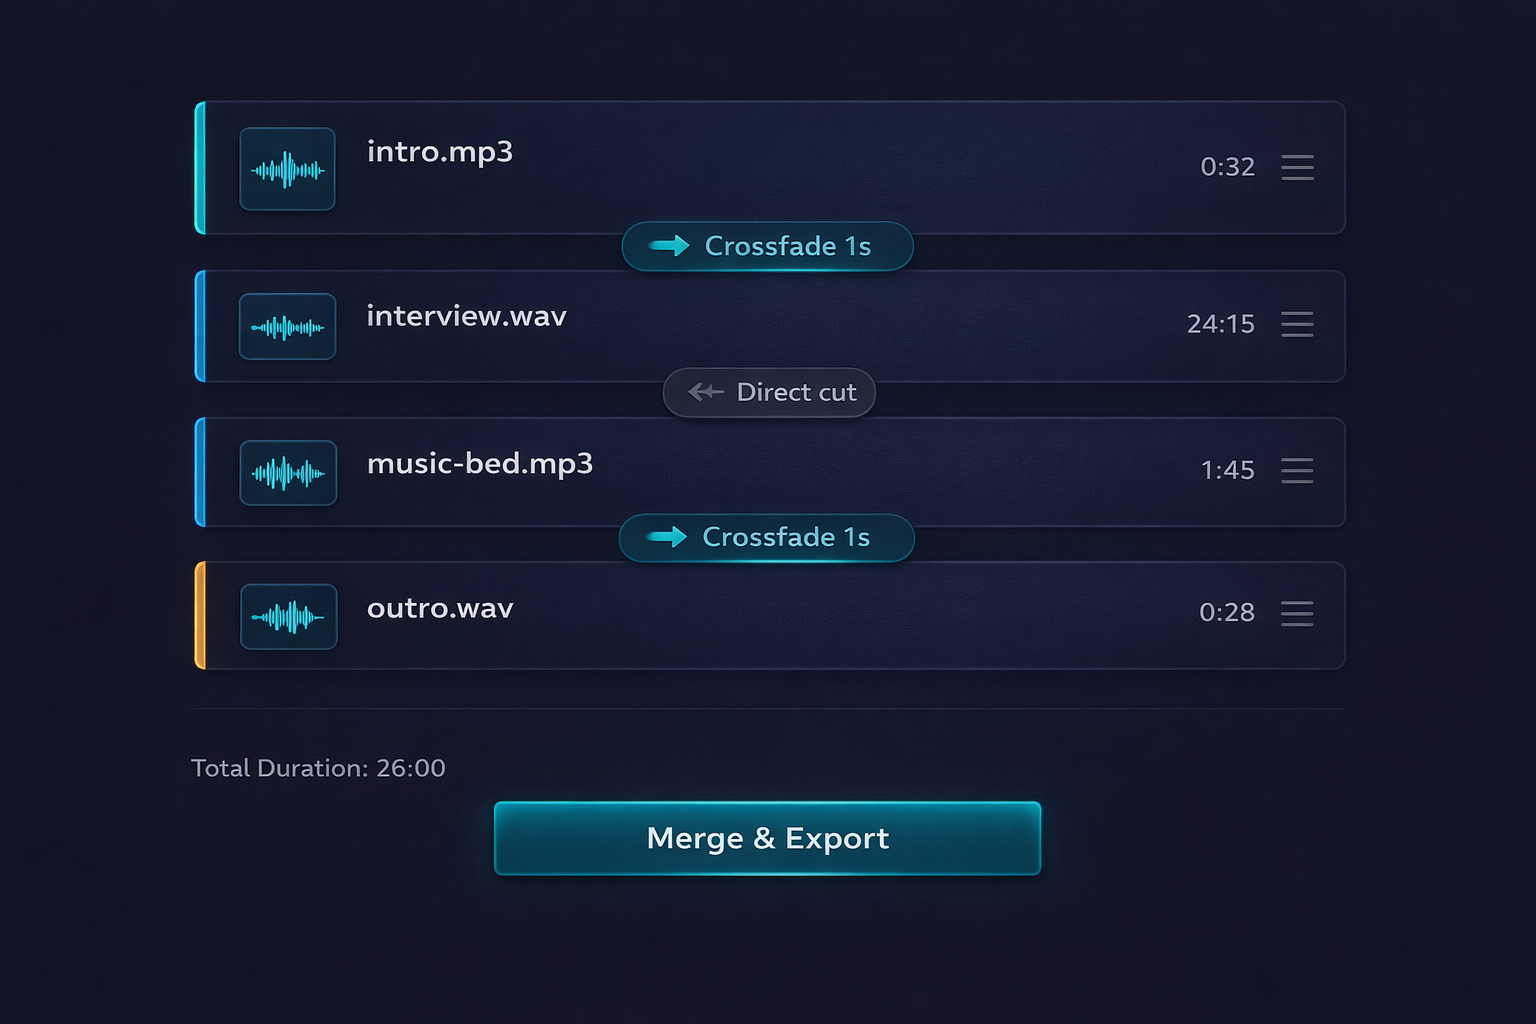
Table of Contents
Merging vs. Mixing Video: What's the Difference?
Before starting, it is important to understand the difference between two operations that many people confuse — and that produce completely different results.
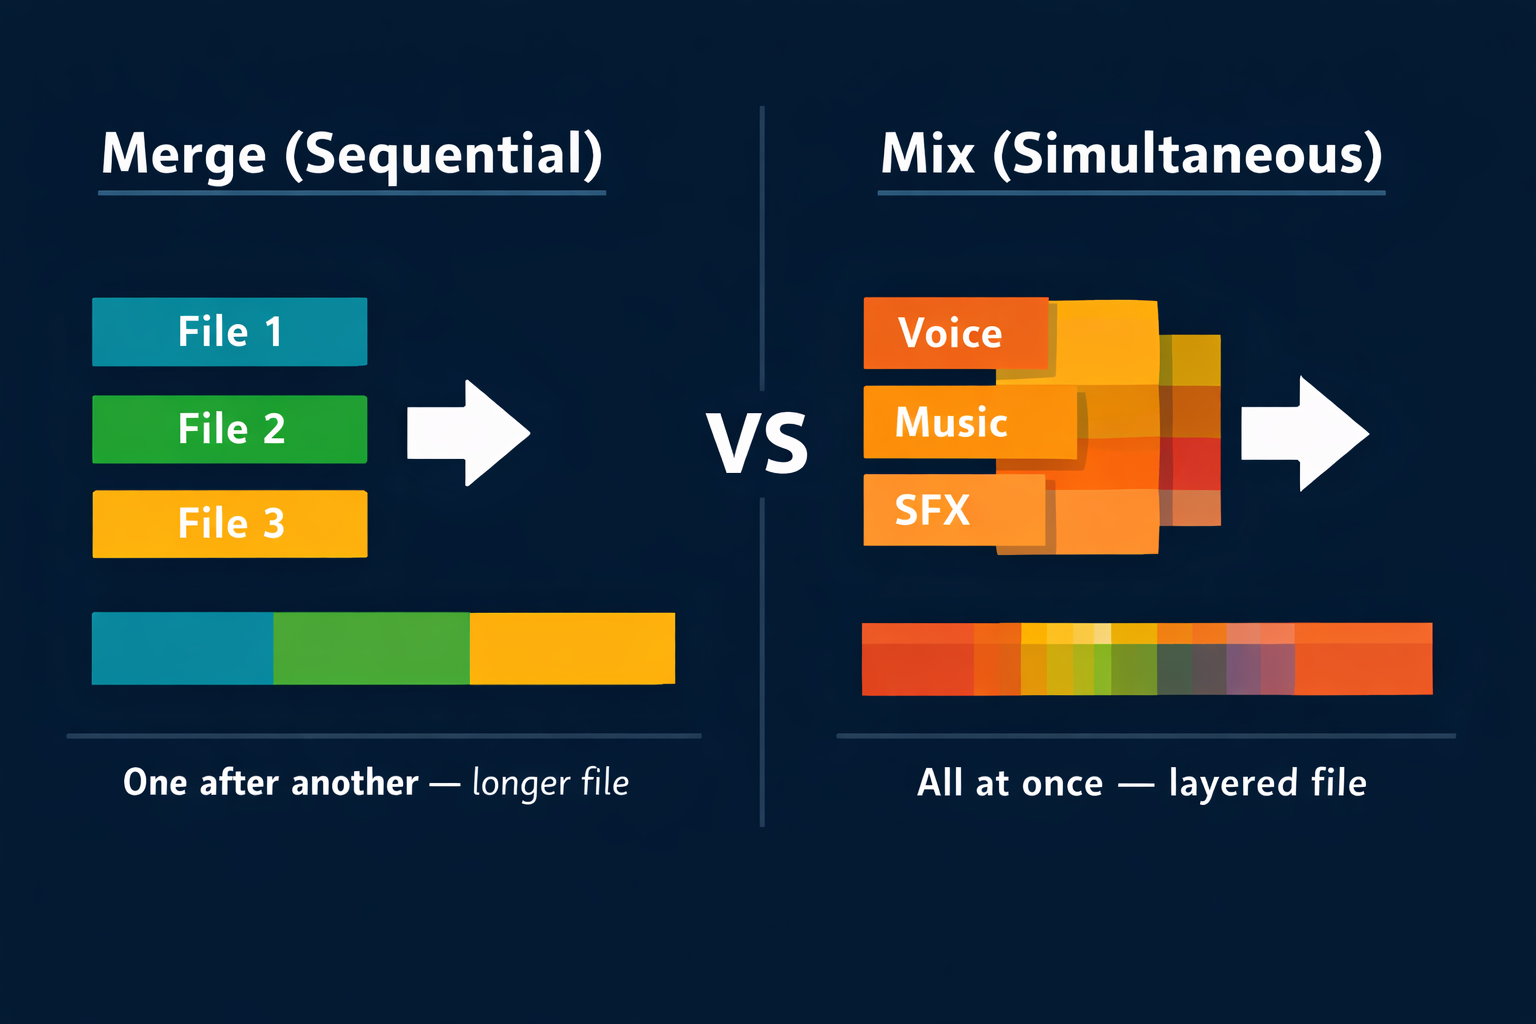
Merge (Concatenate)
Merging video means joining multiple files in sequence — one after another, forming a single longer file. File 1 ends, file 2 begins, file 3 follows, and so on. The result is a single continuous track where all content plays in linear order.
Practical example: you have three files — the video intro (2 minutes), the main content (45 minutes), and the closing (3 minutes). Merging the three creates a single 50-minute file where the intro plays, then the content, then the closing.
When to use merging:
- Join parts of a video recorded in separate sessions
- Combine documentary chapters into a single file
- Join scenes of a project into a continuous compilation
- Unite segments of a class or lecture recorded in parts
Mix (Overlay)
Mixing video means playing multiple files simultaneously — overlaid, playing at the same time. The result is a single file where all layers coexist. This is what happens in a picture-in-picture video: main scene and secondary camera are mixed together.
Edit-Video.Online's merge tool performs sequential concatenation. For mixing with track overlay, use the full video editor.
Preparation: What to Do Before Merging
The quality of the final file depends directly on how the individual files were prepared before merging. Skipping this step is the most common mistake — and the one that most frequently results in visible differences between merged segments.
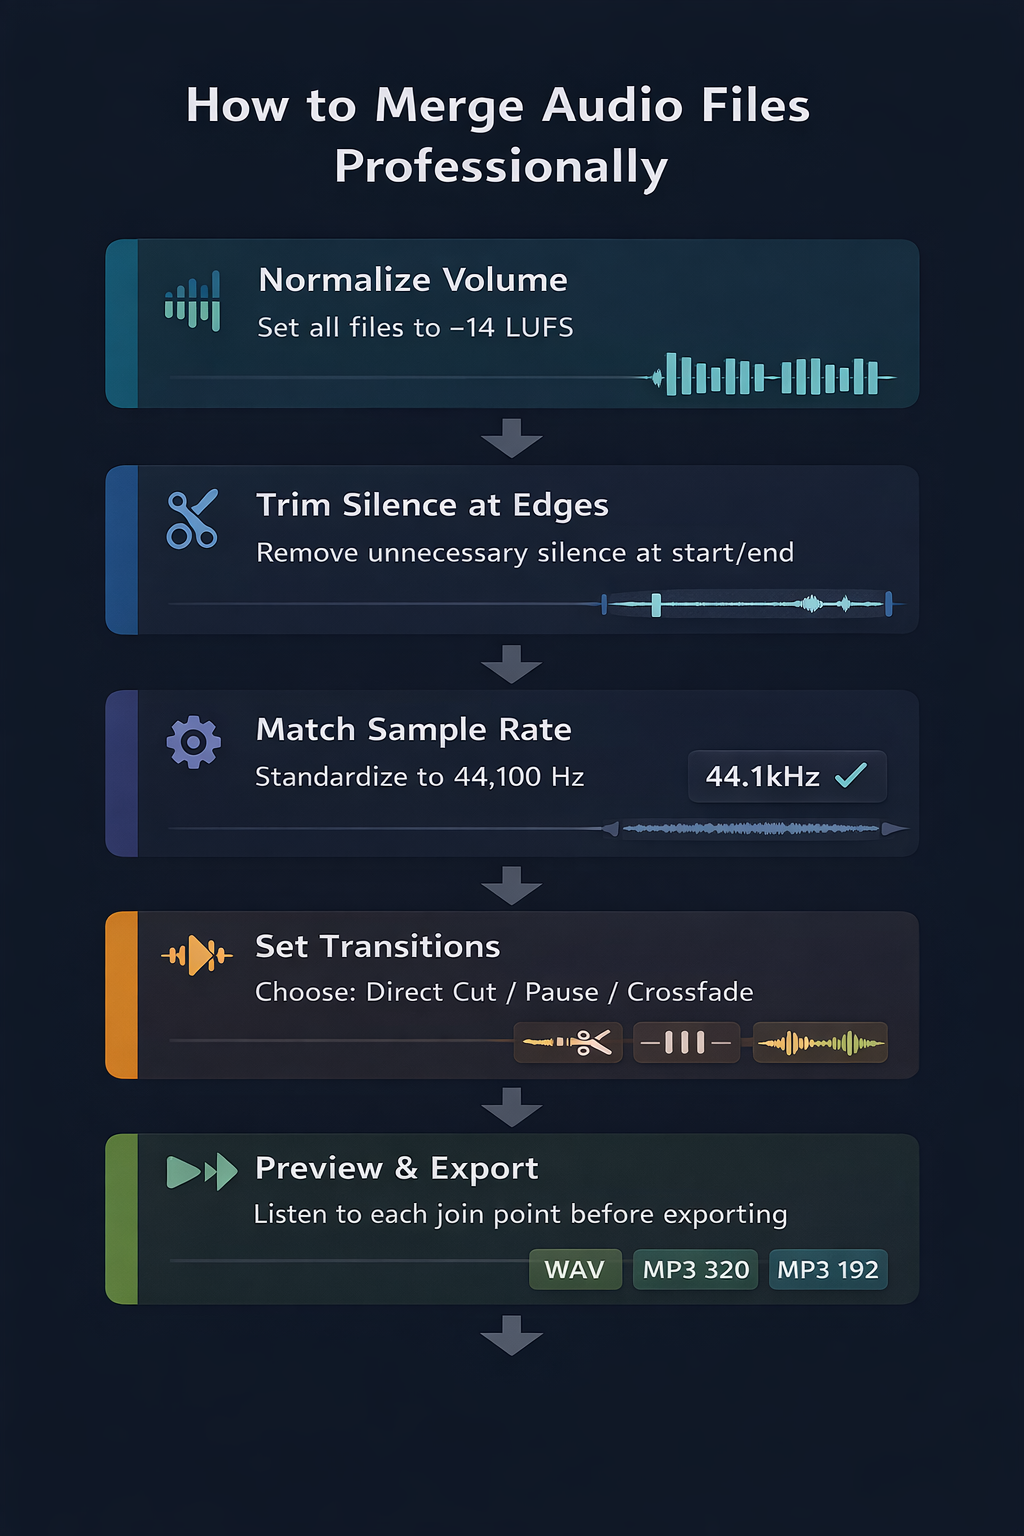
1. Standardize the resolution and codec of all files
The most common problem in amateur merges is resolution differences between segments: the first segment is in 1080p, the second is in 720p, the third is in a completely different format. The viewer notices immediately, and the result looks incoherent.
Before merging, check the resolution and codec of all files. Ideally, all should be in the same format — preferably MP4 with H.264 codec. Edit-Video.Online automatically converts files with different specifications, but prior standardization ensures the best result.
2. Check the frame rate
The frame rate defines how many frames per second the video displays — measured in fps. The most common standard is 30 fps, used in most productions. 24 fps (cinematic standard) and 60 fps (sports and gameplay videos) are also common.
3. Standardize the format when possible
Although the tool supports merging different formats (MP4 with AVI, MOV with WebM, etc.), the ideal is to work with all files in the same format. Mixed files require internal conversion before merging, which may introduce minimal quality variations in compressed formats.
4. Remove unnecessary segments at the edges
Check the beginning and end of each file before merging. Many recordings have 1 to 3 seconds of still frame at the start (before the action begins) and at the end (after the recording stops). These segments accumulate: if you merge 10 files with 2 seconds of still content at each edge, you could end up with over 30 seconds of unwanted content distributed throughout the final file.
Use the video cutting tool to trim the edges of each file before merging.
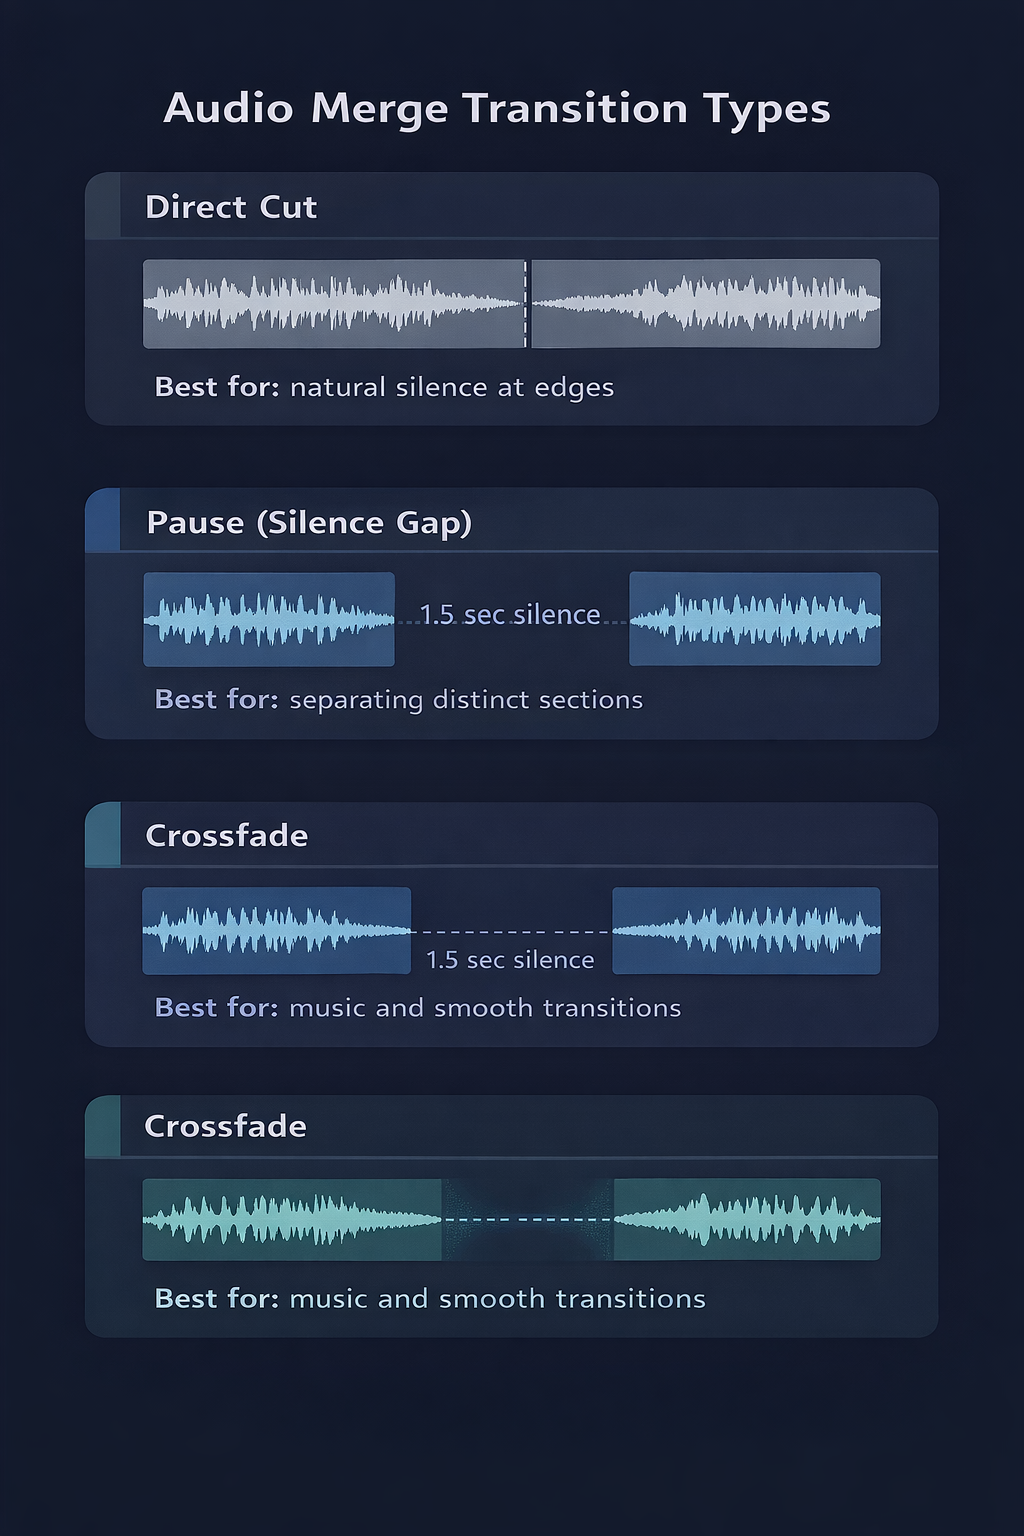
Transition Types Between Segments
The transition between merged files is the detail that most distinguishes an amateur result from a professional one. There are three main options, each suited to different situations.
No Transition (Direct Cut)
Files are joined directly — the last frame of file 1 is immediately followed by the first frame of file 2, with no gap or overlap.
With Pause (Black Screen Between Segments)
A stretch of black screen with a defined duration is inserted between the two files. File 1 ends, there is X seconds of black, and file 2 begins.
Crossfade (Overlap with Smooth Transition)
The crossfade applies a fade out at the end of file 1 and a fade in at the beginning of file 2 simultaneously, with a small overlap between the two. The result is a completely smooth transition — the video seems to flow from one segment to the next without perceptible interruption.
How to Merge Video Online: Step-by-Step
With Edit-Video.Online, the process is straightforward, free, and works in any modern browser — no account needed, no extensions to install, with 100% local and private processing.
Step 1: Access the tool and upload your files
Go to the video merge tool and upload the files you want to join. You can:
- Drag and drop multiple files at once onto the upload area
- Click to select multiple files simultaneously (Ctrl+click or Cmd+click)
- Add files individually across multiple operations
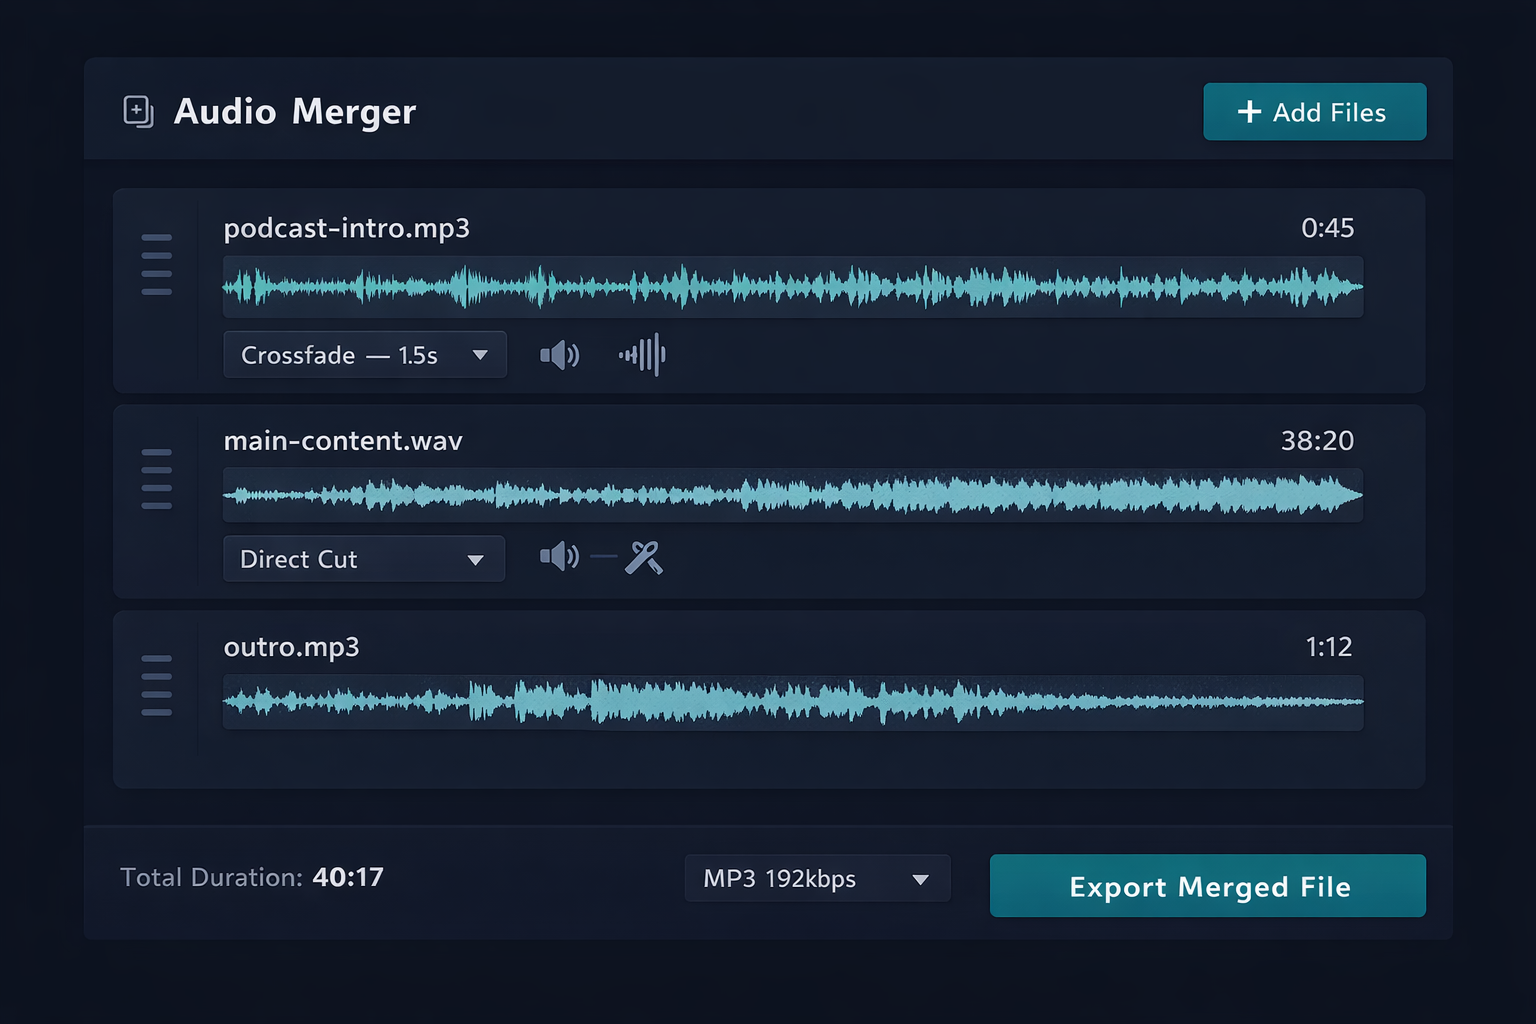
Step 2: Organize the file order
After loading, files appear in an ordered list. Drag and drop to set the playback order. The file at the top of the list will play first; the last file will be the end of the merged output.
Step 3: Configure the transitions
For each pair of consecutive files, choose the transition type:
Step 4: Preview the transition points
Before exporting the complete file, use the preview function to view each transition point individually — the end of file 1 plus the beginning of file 2, with the configured transition. This lets you verify each join without watching the entire file.
Step 5: Adjust and export
If any transition looks odd, adjust the type or duration and preview again. Once all transitions are approved, click export and choose the output format.
Detailed Use Cases
Content Creators: Assembling a Complete Video
A typical YouTube video is composed of multiple segments recorded separately:
- Opening with intro (animation + audio) — 5 to 15 seconds
- Host introduction — 30 seconds to 2 minutes
- Main content — 5 to 30 minutes
- Sponsorship or call-to-action block — 30 seconds to 2 minutes
- Closing — 30 seconds to 1 minute
- End screen with links — 15 to 20 seconds
Teachers: Compiling Course Modules
Online courses often have classes recorded in separate sessions — sometimes on different days, with variations in lighting and framing between one recording and another. Merging these lessons into a single module file improves the student experience, as they don't need to open multiple files.
Filmmakers: Creating a Continuous Project
Audiovisual projects and compilations often need smooth transitions between scenes — without abrupt cuts. Merging all scenes with short crossfades (1 to 2 seconds) or direct cuts creates a single file that plays the project as a continuous experience.
Merging & Format Compatibility
One of the most frequent questions about video merging is: can I join files of different formats? The answer is yes — with some important considerations.
| Combination | Result | Note |
|---|---|---|
| MP4 + MP4 | ✅ Ideal | Same format, no conversion |
| AVI + AVI | ✅ Ideal | Maximum quality, lossless |
| MOV + MOV | ✅ Ideal | Lossless, no quality loss |
| MP4 + AVI | ✅ Good | AVI converted internally |
| MOV + MP4 | ✅ Good | MOV converted internally |
| WebM + MKV | ✅ Acceptable | Both converted internally |
| Any + Any | ✅ Works | Tool converts automatically |
Common Mistakes When Merging Video
Mistake 1: Not standardizing resolution before merging
The most frequent and most visible mistake. Each recording has its own resolution — a file recorded in 1080p will have very different proportions than one recorded in 720p. Without prior standardization, the viewer will perceive the difference at every transition.
How to avoid: standardize all files to the same resolution using the resolution adjustment tool before merging.
Mistake 2: Ignoring unnecessary segments at file edges
Recordings that begin with 2 to 3 seconds of still frame (before the host starts speaking) and end with residual content (after the action ends) create unwanted pauses in the final file — especially when multiple segments are merged in sequence.
Mistake 3: Using crossfade on continuous action segments
Frequently Asked Questions (FAQ)
How many files can I merge at once?
Edit-Video.Online does not impose a fixed limit on the number of files — you can merge as many as you want. The practical limit is your device's available memory, since processing happens locally in the browser. On most modern computers, merging dozens of regular-sized MP4 or AVI files works without issues.
Can I merge files of different formats?
Yes. The tool automatically converts files of different formats to ensure compatibility during merging. For best results, standardize all files to the same format before merging — preferably MP4 for maximum compatibility.
Does merging reduce video quality?
No, if all files are in the same format and resolution. Merging itself is a non-destructive operation — it simply joins files in sequence without additional processing. The only quality loss may occur during export, if converting from a high-quality format to a compressed format.
How do I ensure all segments have the same volume level?
Normalize the audio of all files to the same LUFS level before merging. Use Edit-Video.Online's volume adjustment tool, which lets you set a specific LUFS target for each file. For videos and streaming, use -14 LUFS as the standard.
Conclusion
Merging video professionally goes far beyond simply "joining files." Proper preparation — resolution standardization, codec verification, trimming unnecessary segments — is what determines whether the result looks cohesive and professional or like an amateur collage of disparate segments.
The essential points you learned in this guide:
- Merging joins files in sequence; mixing overlays them — they are different operations
- Standardize resolution of all files before merging
- Trim edges to eliminate unnecessary segments
- Use crossfade for transitions between scenes; direct cut for straightforward content
- Standardize the frame rate to avoid fluidity variations
- Always preview transitions before exporting the final file
Try the video merge tool on Edit-Video.Online right now — free, no installation required, with 100% private processing right in your browser.
Have questions about video merging or want to share your experience? Reach out via our contact form.